While any injury can be devastating, arm injuries can avoid the completion of even standard jobs. Healing can take substantial time and effort to complete just to go back to fundamental proficiency. Once recovered, muscle atrophy in the injured arm provides a number of challenges.
To rebuild your arm strength following an injury, there are numerous elements to consider. The most important element to think about is making sure to avoid re-aggravating the initial injury. Do not try to restore arm strength up until your injury is recovered, and do so under the assistance of licensed physical therapist.
What to Do to Strengthen Your Arm after Injury?
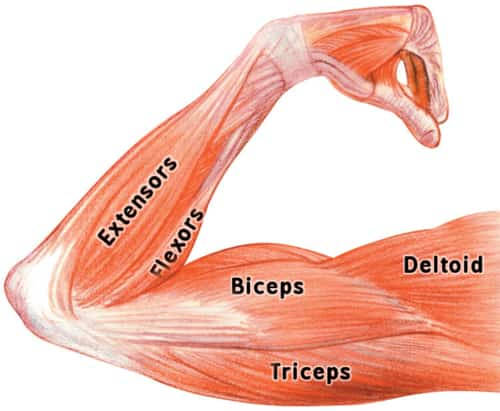
1. Target Muscles
The 3 primary muscle groups in the arm are the biceps, the triceps muscles and the lower arms. While there many small individual muscles through the upper extremities, exercises that target the major muscle groups will help redevelop a base level of strength in the previously injured arm. If the injury is a muscle tear or sprain, pay unique attention to avoid re-tearing that muscle. If the injury was a joint injury in the wrist, elbow or shoulder, focus your strength rehab on slow and stable training.
2. Exercises
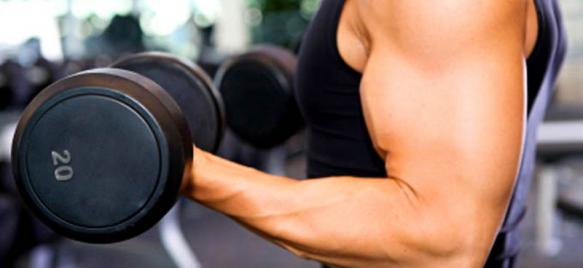
The lower arms are engaged by various exercises that target the biceps and triceps muscles. The secret for rebuilding stamina is to select standard exercises that highlight a complete range of motion for each repetition. The standing dumbbell curl will help you reconstruct stamina in the biceps, as long as the movement is smooth and constant. Hammer curls will engage the biceps as well as the forearms. Lying triceps extensions will also engage the lower arms while you target the triceps. Triceps muscles presses likewise offer a basic, smooth movement for working the triceps.
3. Set Schedule
The focus of rebuilding arm strength is to prevent strongly overloading the target muscles at the beginning. You have to begin more slowly than one normally would, concentrating on re-establishing muscle memory for the types of each exercise, while protecting joints, tendons and muscles. For the first couple of weeks, use standard sets of 8 to 10 repetitions using reasonably light weight. The weight ought to be no more than 75 percent of your previous typical optimum capacity prior to the injury.
4. Equipment
The type of equipment you use will depend upon the type and severity of the injury. Normally, to focus on rebuilding stamina in a single arm, you will devote particular attention to that arm with making use of dumbbells or a cable television attached to a stacked weight machines. You likewise have the option of devoted lever-actuated machines that supply resistance with stacked weight plates, and guide you through an exact type that triggers target muscles. This option is perfect for restoring strength following serious injury, as it helps re-teach you appropriate type, and helps you re-establish fundamental strength in the influenced arm.

How to Train Your Arm Muscles after Injury Without Weights
Often you have to resort to exercises without the use of weights and simulators. Following certain safety rules and after consultation with your doctor (so as not to aggravate hand injury) you can try the following exercises.
1. Arm circles
This arm workout targets your triceps muscles, biceps, and shoulders.
- While standing directly with your feet flat on the ground and arms extended out to the side at a 90-degree angle to your body, start moving your arms in little, quick circles forward.
- Do as lots of rotations as you can and then reverse the movement, doing as lots of circles as you can in the reverse direction.
- Take a break and repeat 2 more times.
- If you need to sit, ensure your feet are flat on the ground and your back is directly.
You will feel this workout in your shoulders. You’ll be able to do more revolutions if you keep your stomach muscles drew in and tight. If you are just beginning, we suggest using our Restore Stretch & Massage Kit to help alleviate tight, knotted muscles in the shoulders and improve flexibility.
2. Tricep dip
- While resting on a chair, grip the edge of the seat with your hands and stretch your legs out in front of you.
- Move your body forward so that your feet are flat, your arms are bent behind you holding you up, and your body is extended above the ground.
- Gradually raise and decrease your body using your triceps muscles.
- Do three sets of 15.
3. Inverted row
This workout targets your biceps. I do this exercise on breaks in my workplace while at work.
- For this exercise, you need to have something to get onto that is within your reach while lying flat on the ground. I suggest lying under a coffee table or a tough chair.
- While grasping the edge of the table or chair, pull your upper body up off the ground, hold for a few seconds and lower yourself pull back.
- Do as numerous as you can, then repeat two times.
This one feels a little unconventional initially, but, after a few repeatings, you will have the ability to feel your biceps working.
4. Push-ups
Considered the granddaddy of arm exercises, the push-up is a great way to build upper-arm strength in addition to a stronger core.
To do push-ups properly, make certain your body is appropriately aligned:
- Keep your feet together with your toes pointed down and your hands shoulder-width apart. The entire length of your body need to run parallel to the ground. Your hips and back should be flat.
- This positioning has to be maintained as you flex your elbows and lower your body to within an inch or two of the flooring. For an extra difficulty, position a yoga block under each hand as this will deepen the stretch and increase your core workout.
- Then reverse this motion and repeat.
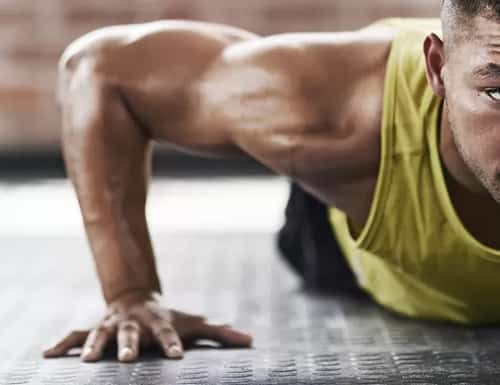
If push-ups are still new to you, you may want to keep your knees down with your weight on your thighs (not your knees) up until you’ve developed enough strength to perform a complete push-up.
5. Pull-ups
Pull-ups offer numerous advantages for your upper body. They are specifically beneficial for reinforcing the muscles in your arms, chest, shoulders, and sides of the back. Nevertheless, you might require a partner to help you as you raise your body approximately the horizontal bar, because pull-ups include raising your full body weight.
To carry out pull-ups properly, location your hands shoulder-width apart on the horizontal bar.
Next, raise your body up until your chin is just over the bar’s level.
Then ease your body back down and repeat.
6. Plank
Plank posture becomes part of the Sun Salutation series in numerous forms of yoga, but to tone flabby arms, you can just hold slab pose or incorporate difficult variations of it.
Like a push-up, you will need to place your body horizontal to the ground, however keep your body in this position for 30 seconds or more to work your arms.
Ensure your wrists are directly under your shoulders and your back remains in a straight line.
To offer yourself more of an obstacle, lower your elbows to the ground and either clasp your hands together or lay your forearms and hands flat versus the ground, using your arm muscles throughout the present.
7. Downward Dog
Downward dog is another Sun Salutation present that tones the arms. For this present, your body will form a reverse V-shape with your heels pressed down or near the flooring and your hands flat on the floor. Ideally, your spine will follow a straight line toward the ground with your hips pushed back. You may have to bend your knees to keep your body in the reverse V-shape.
Utilize your arms to press your weight back towards your heels and ensure you’re not rounding your back. Much like plank pose, you can provide yourself more of a challenge by lowering your lower arms to the ground and holding the position.
8. Handstands and Headstands
Handstands and headstands are more than simply balancing. Both positions require a lot of upper-arm strength to keep your body upside-down and in correct positioning.
If you’re a novice when it concerns headstands and handstands, you can do both positions against a wall up until you work up the strength (and nerve) to carry out the positions without the wall’s support.
In both positions, you’ll also have to utilize your core muscles, keeping your stomach drawn in, to maintain balance.
- To get in the headstand position, crouch down in front of a wall (cleared of any furniture, hanging images, or other barriers) and grip your hands together with your elbows about shoulder-width apart.
- You will position your head between your elbows.
- Lift your upper hands one at a time up until they’re both against the wall.
- Throughout this present, keep the top of your head off the flooring using your arm muscles in an up, lifting movement.
For handstands, place your hands on the flooring shoulder-width apart, and keep your look on the floor as you raise your legs off the flooring to the wall. Keep your elbows directly by using your arm strength.
To get out of a handstand or a headstand, take one leg down, followed by the other.
Producing toned arm muscles without using weights takes some time and dedication, but by doing these basic arm workouts three to 4 times a week, combined with a healthy diet, your arm muscles will take on a long, lean, toned appearance that will have you reaching for your preferred strapless gown for your next night on the town!