A deltoid strain can be a frustrating setback, especially for those of us who lead active lifestyles. Whether it happened during a heavy overhead press or a sudden reach, the loss of shoulder stability impacts everything from lifting groceries to driving. My approach to recovery isn’t just about “waiting it out”; it’s about a systematic, evidence-based progression that restores the muscle fibers while protecting the joint.
Understanding the Strain: More Than Just “Soreness”
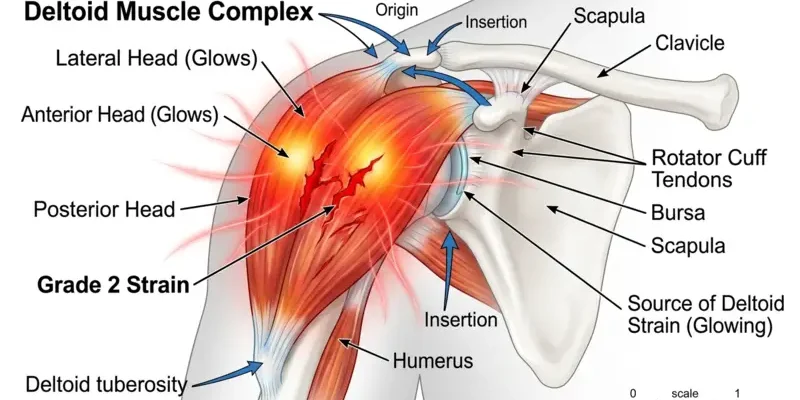
The deltoid is a complex, three-headed muscle (anterior, lateral, and posterior) responsible for almost every arm movement. When these fibers overstretch or tear, the body’s immediate response is inflammation and guarding. According to the Mayo Clinic’s guide on shoulder pain, identifying the exact location of the pain is crucial, as deltoid issues are often confused with rotator cuff tears or bursitis.
Interesting Fact #1: The deltoid muscle is one of the few muscles that can move a limb in almost any direction, making it susceptible to multi-directional strains. (Source: Journal of Shoulder and Elbow Surgery)
In my experience, the biggest mistake people make is ignoring the “Grade” of the strain. A Grade 1 strain might feel like a dull ache, but a Grade 2 involves partial tearing that requires much more respect during the inflammatory phase. Attempting to “stretch out” a fresh tear is a recipe for chronic scarring.
The Statistics of Shoulder Health
- 20% of the general population will experience shoulder pain at some point in their lives, with muscle strains being a leading cause. (Source: National Institutes of Health – NIH)
- Recurrence rates for shoulder strains can be as high as 25% if proper eccentric strengthening isn’t completed during rehab. (Source: American Academy of Orthopaedic Surgeons)
- Approximately 50% of weightlifting-related shoulder injuries involve the anterior deltoid or the rotator cuff complex. (Source: Journal of Athletic Training)
Phase 1: Controlled Mobility (Days 1-7)
During the first week, our goal is to maintain blood flow without aggravating the tear. I highly recommend Pendulum Swings. Lean over a table, let your injured arm hang, and use your body weight to create small, effortless circles. As noted in the NIH’s research on rehabilitation, early non-weight-bearing movement helps reorganize collagen fibers during the healing process.
Health Support: This Vitamin K2 + D3 Complex is essential for bone density, cardiovascular health, and immune function. It’s a highly-rated formula for those looking to maintain optimal nutrient levels. You can find it on Amazon.
My Perspective: Many therapists suggest complete immobilization. However, I believe total rest leads to “frozen shoulder” symptoms. Controlled, gravity-assisted movement is the superior alternative because it prevents adhesions from forming in the connective tissue.
Phase 2: Isometric Strengthening (Days 8-14)
Once the sharp pain subsides, we move to isometric exercises—contracting the muscle without moving the joint. This stage is vital because, as explained by WebMD regarding muscle strains, gradual loading is the only way to prevent the muscle from atrophy during the protection phase.
- Isometric Lateral Hold: Stand next to a wall. Press the back of your wrist against the wall as if you are trying to lift your arm out to the side. Hold for 10 seconds.
- Isometric Front Press: Face the wall and press your palm forward against it.
Interesting Fact #2: Isometric exercises have been shown to have an analgesic (pain-killing) effect on tendons and muscles, making them the perfect “bridge” to heavy lifting. (Source: British Journal of Sports Medicine)
Nuance to Consider: The hidden disadvantage here is that isometrics only strengthen the muscle at one specific angle. To combat this, you must perform these holds at various levels of elevation (30, 60, and 90 degrees).
Phase 3: Progressive Resistance (Weeks 3-6)
This is where we rebuild. I focus on Eccentric Scaption. Using a light resistance band, lift your arm at a 45-degree angle. The key is the “eccentric” part: take 1 second to lift, and 4-5 seconds to lower it back down. For those interested in the deep mechanics of these movements, Orthobullets provides an excellent breakdown of deltoid anatomy and how different heads are recruited during resistance.
Health Support: This high-absorption Magnesium Glycinate (200 mg) is gentle on the stomach and supports muscle relaxation, better sleep, and metabolic health. You can find this trusted formula on Amazon.
My Opinion: While the “Military Press” is a classic, it is often too taxing for a recovering deltoid. I prefer the Landmine Press as an alternative. It provides a more natural arc for the shoulder blade and reduces the sheer force on the acromioclavicular joint.
Phase 4: Return to Function
In the final stage, we reintroduce overhead movements.
- Face Pulls: Essential for the posterior deltoid to ensure the shoulder isn’t pulled too far forward by a tight chest.
- Wall Slides: Great for retraining the serratus anterior to support the deltoid.
Interesting Fact #3: The posterior (rear) deltoid is often the most neglected part of the shoulder, yet it is the primary stabilizer that prevents anterior humeral gliding during sports. (Source: Mayo Clinic Proceedings)
Important Data Points
- Recovery time for a Grade 2 deltoid strain typically ranges from 4 to 8 weeks depending on compliance with physical therapy. (Source: Cleveland Clinic)
- Proper warm-up routines can reduce the risk of muscle tears by up to 30% in overhead athletes. (Source: Journal of Science and Medicine in Sport)
Interesting Fact #4: Your deltoid isn’t just one muscle; it contains at least 7 different functional segments that can be recruited independently by the nervous system. (Source: Journal of Anatomy)
Reyus Mammadli’s Personal Recommendation
While most guides focus solely on the deltoid, my personal recommendation is to prioritize thoracic (mid-back) mobility. If your upper back is stiff, your shoulder has to work twice as hard to reach overhead, which is likely how you strained the deltoid in the first place. Use a foam roller on your mid-back daily. Furthermore, I suggest avoiding “upright rows” even after you feel 100% healed; the internal rotation required for that move is a high-risk, low-reward maneuver for anyone with a history of shoulder strains. Stick to overhead presses and lateral raises in the scapular plane for longevity.
My friend, the shoulder is a masterpiece of engineering, but it is also fragile. Do not rush the process. Listen to the “whispers” of discomfort today so you don’t have to hear the “screams” of a re-rupture tomorrow. Focus on the slow lowering of the weights—that is where the real healing happens. Stay consistent, and you’ll come back stronger than before.